History: The Ship and Crew
Service History
After being laid down in for the Royal Navy as HMS Phaeton, Sydney was purchased (before launching) by the Australian Government in and renamed in memory of the earlier Sydney that destroyed the German cruiser Emden in .
The ship commissioned at Portsmouth on , under the command of Captain John U.P. FitzGerald, RN, and spent the early part of her career on the Mediterranean Station taking an active role in the Abyssinian crisis.
Arriving in Australia on Sydney remained in home waters until the outbreak of war and was in Fremantle on the day war was declared. On Captain J.A. Collins RAN, assumed command from Captain John W.A. Waller RN, who had succeeded Captain FitzGerald in .
Sydney remained on local patrol duties until when she sailed from Fremantle as part of the escort for a large Middle East bound convoy. Parting company in the mid-Indian Ocean, the cruiser arrived in Colombo on .
On she proceeded to the Mediterranean and arrived in Alexandria on where she joined the 7th Cruiser Squadron of the Mediterranean Fleet. Here Sydney experienced her first action when she took part in the bombardment of Bardia on in company with the British cruisers Orion and Neptune , the destroyers HMS Dainty , Decoy , Hasty, HMAS Stuart and the French battleship Lorraine .
A week later Sydney , in company with other ships of the 7th Cruiser Squadron, encountered three Italian destroyers. The action that followed was fought at dusk in fast failing light and two of the destroyers succeeded in evading the Allied cruisers. Sydney's role in this action consisted chiefly of finishing off the remaining destroyer Espero and rescuing 47 Italian survivors.
On Sydney returned to Alexandria , where she remained until when she proceeded as part of the covering force for Malta convoys before joining the Mediterranean Battle Fleet. Following a period of severe air attacks, four of them directed at Sydney , that were successfully beaten off she then took part in the first full-scale action with the Italian Fleet; the Battle of Calabria on .
The Battle of Calabria
The major British forces engaged in this action were as follows:
- Battleships
- HMS Royal Sovereign
- HMS Warspite
- HMS Malaya
- Cruisers
- HMS Liverpool
- HMS Neptune
- HMS Orion
- HMAS Sydney
- Aircraft Carrier
- HMS Eagle
- Plus attendant destroyers.
Aircraft from HMS Eagle first reported the Italian fleet to the north of the British Forces. The Commander-in-Chief, Admiral Sir Andrew Cunningham ( Warspite ), promptly altered course to the northward. At , HMS Neptune reported sighting four Italian cruisers, and at the entire enemy fleet came into view, consisting of 2 battleships, 10 cruisers and 24 destroyers. Meanwhile the vanguard of the British Fleet, consisting of the four cruisers, Liverpool , Neptune , Orion and Sydney under Vice-Admiral J.C. Tovey (7th Cruiser Squadron), altered course to avoid becoming heavily engaged without the support of Warspite's heavy armament.
With the sun behind them, the Italian cruisers opened fire at . The British cruisers, though outnumbered, engaged the enemy until , when Warspite opened fire. The battleship's fire forced the enemy to turn away under cover of smoke, after which there was a lull in the battle. At this stage, the British cruisers were advancing north-west towards the enemy, with Warspite astern. Malaya and Royal Sovereign , that had been some distance away, were fast approaching the scene of action and the British destroyers were concentrating for attack.
At about , Warspite succeeded in straddling the Italian battleship Glulio Cesare and a 15" shell hit forward near her foremost funnel. Soon after , Warspite , which had been firing at extreme range, attempted to close the enemy. Malaya also opened fire, but her heavy salvoes all fell short. Meanwhile, the Allied cruisers had renewed the action and attempted to close the enemy who was rapidly drawing away to the north. By , only one enemy ship remained within range, at something over 20,000 yards and at , Sydney turned her attention to enemy destroyers laying smoke. Shortly afterwards, the British destroyers moved in to attack. By the engagement was over, however air attacks on the Allied fleet followed. Sydney again came through unscathed, despite a stick of bombs straddling the ship.
Sydney remained at sea with the Mediterranean Fleet until when she returned to Alexandria .
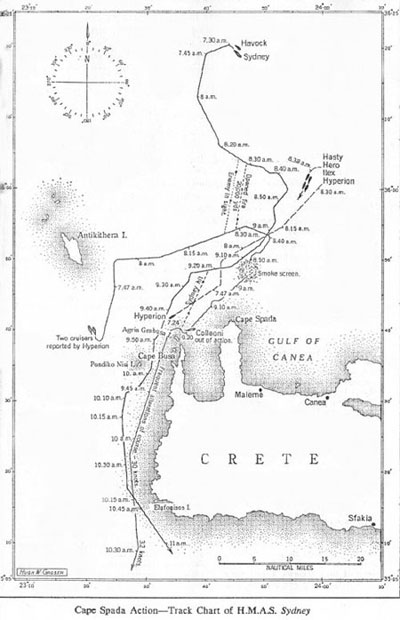
The Battle of Cape Spada
On , Sydney in company with the destroyer HMS Havock , sailed from Alexandria . Her orders were to support the destroyers Hyperion , Ilex , Hero and Hasty engaged in a hunt for enemy submarines off Crete, and destroy enemy shipping in the Gulf of Athens . The two ships arrived off Crete at sunset and passed through Kaso Strait shortly before midnight.
Early on the morning of Sydney and Havock reached a point some 40 miles north of Cape Spada . The day had dawned calm and cloudless, with some light mist. At , Sydney received a report from the destroyer group indicating the presence of two enemy cruisers some 10 miles to the south west of their position, heading north.
On his own initiative, Captain Collins altered course and proceeding at maximum speed, Sydney and Havock headed towards the enemy, and at sighted smoke on the horizon. A few minutes later two Italian 6-inch gun cruisers, the Bartolomeo Colleoni and the Giovanni Delle Bande Nere , were sighted on the starboard beam, at a range of some 23,000 yards, course East-North-East.
At , Sydney opened fire with her 6-inch guns on the leading cruiser Giovanni Delle Bande Nere . At , both cruisers replied to Sydney's fire. None of the enemy shells scored a hit, though some salvoes succeeded in straddling. Within six minutes of opening fire, hits appeared to have been registered on Giovanni Delle Bande Nere on whom Sydney continued to concentrate her fire. At , Hyperion, Hasty , Hero and Ilex were sighted to the south east, at a distance of some six miles. At this time, the enemy attempted to escape to the south west and by , Sydney , with the destroyers in line abreast and in fairly close order, was chasing the enemy at full speed, the destroyers having also opened fire.
By , Giovanni Delle Bande Nere was obscured by smoke, and Sydney therefore shifted her fire to Bartolomeo Colleoni at a range of 18,000 yards. At , the two enemy cruisers suddenly altered course to port and at , appeared to be turning to starboard, eventually coming back to their original south-westerly course, having left a large smoke screen behind them. The Italian cruisers were faster than Sydney , and were slowly drawing away at approximately 30 knots. At , Sydney again opened fire on Giovanni Delle Bande Nere at 21,000 yards and kept firing until , when heavy smoke again forced a shift of target to the rearward cruiser.
By , Sydney's fire on Bartolomeo Colleoni appeared to be taking effect and the range had closed to 17,500 yards. Meanwhile, both cruisers continued to reply with fairly accurate fire and at , Sydney was hit in the foremost funnel. Only one minor casualty resulted. The range was now closing rapidly and at , Bartolomeo Colleoni was finally put out of action, some 5 miles off Cape Spada . The surviving cruiser rounded Agria Grabus Island to the north, and retired at full speed to the south-west, hotly pursued by Sydney who was almost directly astern.
A , Captain Collins ordered the destroyers to finish off Bartolomeo Colleoni with torpedoes, Sydney ceasing fire at , when the range was 7,500 yards. The destroyers Hyperion and Ilex then fired torpedoes at Bartolomeo Colleoni and the destroyer Havock stood by to rescue survivors. Bartolomeo Colleoni finally sank at . Meanwhile, Sydney, in company with Hero and Hasty, continued the pursuit of Giovanni Delle Bande Nere who had continued to the south at full speed. The fleeing cruiser kept up a desultory inaccurate fire, but Sydney did not reply until at a range of 20,000 yards. The chase continued until when the fast opening range and hazy conditions made overhauling unlikely.
At , with only 10 rounds of 6-inch shell available to her forward turrets Sydney reluctantly abandoned the chase and was ordered to return to Alexandria to replenish fuel and ammunition. Before reaching Alexandria , Sydney and the destroyers were subject to repeated air attacks with Havock sustaining a direct hit. At the triumphant Sydney in company with the British destroyers reached Alexandria safely where they were met with rousing cheers from units of the Mediterranean fleet.
During Sydney took part (as a covering force) at the second bombardment of Bardia. In , she spent her longest period in harbour since entering the Mediterranean, when she docked in Alexandria on , and remained in port until . In she was again operating with the Mediterranean Fleet taking part in a sweep of the Adriatic and in protecting convoys to Greece .
On the British Mediterranean Fleet successfully launched an attack by carrier aircraft on the Italian fleet which was concentrated in the port of Taranto . In support of this operation Sydney , was engaged in operations in the Straits of Otranto, when an Italian convoy was successfully attacked during the hours of darkness of the night of /. saw Sydney again covering convoys to Greece and Malta and participate in further operations in the Adriatic and Straits of Otranto, as part of the Mediterranean Fleet. On she put into Malta for a refit, sailing again on .
Return to Australian Waters
On Sydney sailed from Alexandria for the last time and reached Fremantle on . A refit at Garden Island in Sydney followed after which she took up patrol and convoy escort duties off the Australian coast under the command of Captain J. Burnett RAN. In , she paid a brief visit to Singapore , and later in the year visited Noumea , Auckland and Suva in her role as convoy escort before returning to Western Australian waters.